


Step-by-Step Guide to Calibrating Scales
Calibrating your scales is key for maintaining accurate measurements, so you can ensure that your results are reliable. Over time, scales can become less precise due to wear and tear or changes in temperature and humidity. This is why we’ve created a step-by-step guide to calibrating scales.
If your scales are not calibrated correctly, you may be under- or over-estimating the weight of your objects. This in turn can result in mistakes appearing in your calculations and potentially affecting the quality of your products or research.
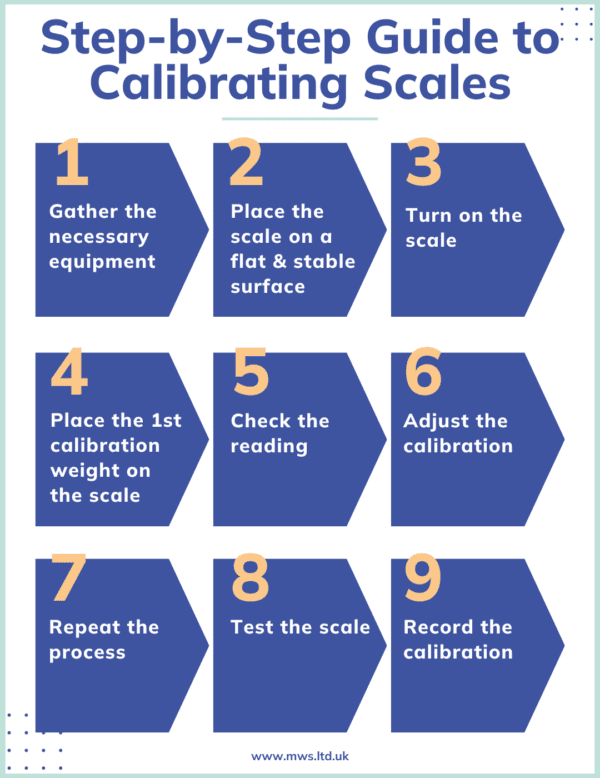
Step-by-step guide to calibrating your scales:
- Gather the necessary equipment: To calibrate a weighing scale, you will need a set of calibration weights, a flat and stable surface, and any documentation or instructions that came with the scale.
- Place the scale on a flat and stable surface: It is important to make sure that the scale is on a surface that is level and free from vibration, otherwise it can affect the accuracy of the calibration.
- Turn on the scale: Follow the instructions in the scale’s manual to turn on the scale. Your scale may require you to press a button or switch to the “calibration” mode.
- Place the first calibration weight on the scale: Choose the lowest calibration weight in your set and place it on the centre of the scale’s platform.
- Check the reading: The scale should display the weight of the calibration weight. Check the reading against the known weight of the calibration weight. If the readings are not within the acceptable range specified in the scale’s manual, you will need to adjust the scale’s calibration.
- Adjust the calibration: Review the scale’s manual for instructions on how to adjust the calibration. This may require you to press a button or entering a code on the scale’s control panel.
- Repeat the process: Repeat steps 4 through 6 with the remaining calibration weights, gradually increasing the weight of the calibration weights each time.
- Test the scale: Once you have finished calibrating the scale, test it by weighing a few known objects and comparing the readings to their known weights. If the scale is reading accurately, you can be confident that it is properly calibrated.
- Record the calibration: It is a good idea to record the date and details of the calibration in a log book or on the scale’s documentation. This will help you to track the scale’s performance and identify any issues that may occur in the future.
The idea is to calibrate your scales periodically which helps to ensure you are getting accurate and reliable measurements.
However, many industries require you to have traceable calibration certificates which must be generated by a third party.
If this is something you require, speak to MWS today to receive a free quote.